
Monday, 30 April 2012
Friday, 27 April 2012
Final Versions

Front
Cover
Since
the versions I posted just before the Easter holidays, I've changed the front
page about a fair bit.
I
removed the keyring box due to feedback saying it's tacky and doesn't conform
to music magazine conventions, not to mention that my style models don't gift
keyrings.
- I re-wrote the upper left corner information to match the new contents page, and also removed the white outline to make it neater.
- I flipped the main image as it looked odd having a big blank space, and the text didn't look right where the keyring box was.
- The text I added last minute to make it look more authentic.
- I changed the colour of the bottom text so it's more eye-catching, and so it’s more colour variety. Not just glaring orange and white. It also emphasizes the blueish background and the model's purple earrings and top.
- Fixed a little spacing issue on the barcode.
I
have conformed to the convention of my main style models Q and NME by having a
big main image with superimposed text on top. I have also conformed to the
concept of a simple, clear colour scheme that works together. Added the little
S as I've seen it like that in Q magazine and I liked it, as it's a strong
reminder of what magazine this is and what exactly you’re going to be paying
for.
To
edit the main image, I used Adobe Photoshop. I used the spot healing brush and
patch tool, and cropped the image down to a close up/mid shot. The fonts I used
were Bitstream Vira Sans, Broadway, Hobo Std, and the basic Arial font. I used
Adobe InDesign to create all the pages, a new program for me which I had to
learn to use fairly quickly! Photoshop is also new to me, though my experience
working with Macromedia Fireworks Artweaver Free and Adobe Illustrator helped
me grasp the basics quickly.
In
InDesign, I used the Text Box tool, Shape Tool, Direct and normal Selection
Tools, the Eyedropper Tool, Rotate Tool, Colour Picker Window, and a fair bit
of the zoom in and out tool. The newest tool I’ve learnt to use is the Frame
Tool, which I never even used when creating my magazine. I did when doing a
rough plan of where things are going to go, but in the end it was just easier
to place images and text directly onto the page, rather than mess about with
frames.
If
I could change anything now, I'd add a few more little features on the front
cover. Like a circle with text in, and I’d redo the logo as I think this one
looks tacky.
What
I like about my front cover is the main image itself (eye-catching and quirky,
fits with the genre!) and the quote below the name.
I believe it appeals to my target audience of young teens to young adults, as it looks trendy and hip. Something the audience would be willing to be seen buying.


I believe it appeals to my target audience of young teens to young adults, as it looks trendy and hip. Something the audience would be willing to be seen buying.

Contents
Page
Definitely
changed it a bit!
- Removed the keyring section as I no longer was using it.
- Removed the legal information and moved address information to below the back issue info to clear space and reduce text.
- Added the photo in place of the keyrings to add variety, put a quote on and the band name, along with a page number.
- Removed the second image, and put one big image instead. This reduces cluttering and makes the design adhere to Q magazine contents page, as they usually have a big main image, with other smaller images dotted around.
- I put the editors note in a blank space, looked odd otherwise.
- Changed the front cover image In the top right corner to match the new cover.
I’ve
added little details such as a page number and logo, issue date and printing
information, in order to make it seem more believable as an official music
magazine. The little S is again based on Q magazine, which has the logo on the
bottom of pages, and in the address information.
Continued
the house style by having the orange colour and the fonts Broadway and
Bitstream Vira Sans. This helps to tie the front page to the contents page,
making it flow.
The
images I edited in Photoshop. Magnetic lasso and Quick Selection tools were
used on the big main image to cut it out, and a black and white Colour
Adjustment on the second image, which gives it an atmosphere and edge, which
you would expect in an indie magazine.
If
I could change anything, I would move the printing information down a little,
as theres space at the bottom, making it look odd to be so close to the orange.
I’d also move the website address over to the left, but I think it’s ok as it
is right now.
Things
I like about my contens page, is the back issue information, address and
printing information. I also like how the editors note works with the orange
‘glow’, drawing the viewer’s vision to the edges of the orange, to find the
note there.

Double
Page Spread
Before
Easter, I had no image, the text was too big, and there was no additional
information about the artist.
- Added release information for the album
- Removed one of the quotes, as I added breakout quotes to make it less of a block of text.
- Added a caption to the image, wrote more as way of a subtitle to identify what kind of artist she is.
- I wrote more text, as I had to reduce the font size to 10 which drastically reduced the amount of text I had.
- Fixed little typos and grammar mistakes here and there.
The
main image I edited in Photoshop. I duplicated the main image layer, and cut
out the model in one. I then added a red Colour Adjustment to it, and did a blue/green
colour adjust to the layer behind it. This gives it a slightly 3D, interesting
appearance, which works with the alternative/indie vibe I’m trying to create in
the magazine.
I
like the colours, the page number/logo/issue date thing, and I had fun writing
the Q&A for the spread.
I
don’t like how sparse the main image is, if I could, I’d fiddle about with the
album information abit, maybe make it into a proper information box.
Diary Entry Five
Bonjourno!
I met the deadline! :D Am just about to post my final pages with my thoughts.
I've blogged my keyring designs, my album cover designs, and what photos I've used before and after editing.
I've started ti write a script for my evaluation, i'm going to do a video with some music and me talking and answering the questions. I should have that completed and posted before or on the deadline of 28th of May (though I want to do planning on my blog, so perhaps before or on May 1st?).
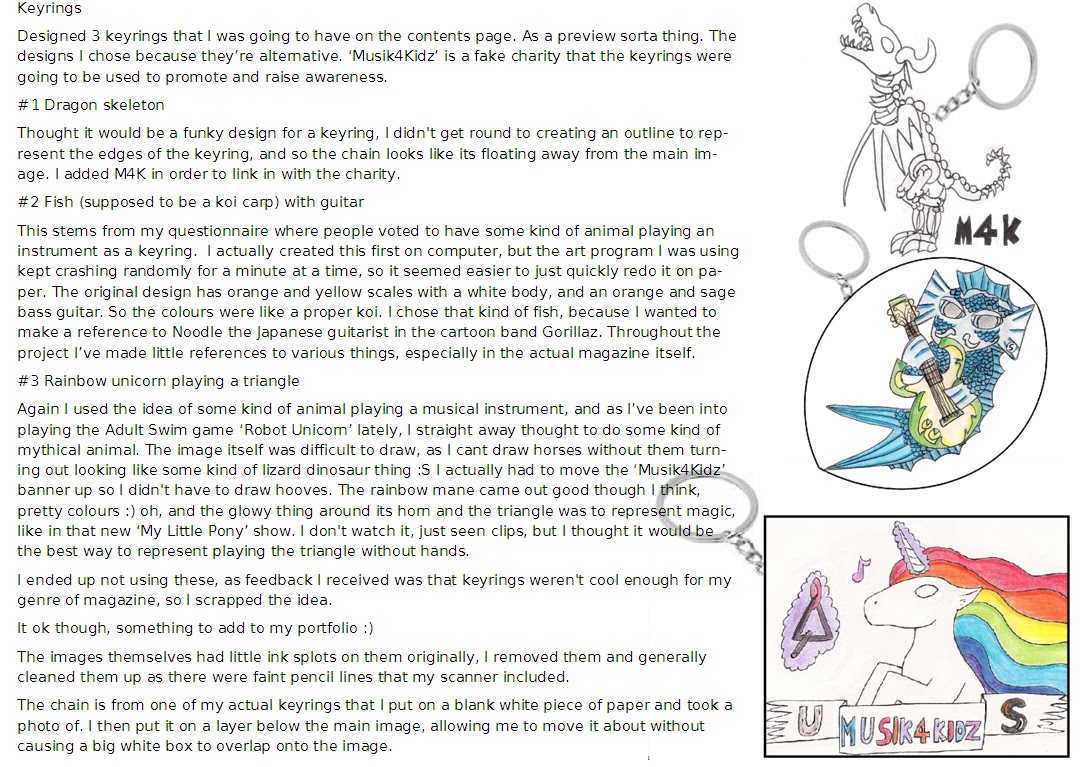
Album Covers

I did them just before the rough cut deadline, and the hand drawn ones I did the day before the final deadline.

Sunday, 22 April 2012

Subscribe to:
Comments (Atom)